
The Reaper Feature That Automated My Entire Post-Show Workflow
During lockdown, I spent a lot of time learning how to use the DAW that a number of people avoid; Reaper. With Tracks Live not working on modern versions of macOS, engineers needed a cost-effective solution. At the time, Pro Tools was still limited in channel count without an HDX system and Logic being a Mac-only solution left most people still trying to hold on to older systems that supported Tracks Live. Tanner Kinney and I used this gap in the industry to develop what was formerly known as Eclipse.
Eclipse was a configuration for Reaper that effectively stripped away the things that made users shy away from Reaper and bring to the forefront the power and efficiency of all the things Cockos has developed within this formidable DAW. While I don’t suggest everyone switch to Reaper for every situation where you would use a DAW, I have found a love for the software in how it speeds up my workflow. Over the years, the landscape of DAWs that are capable of high channel count recording has increased. AVID has increased the channel count for native versions of Pro Tools, Mac minis running Logic Pro can handle insane track counts, software programs like LiveTrax from Harrison are making waves, and many more options abound.
Recently, I was in a conversation about the upcoming LiveTrax 3 features and its integration into the DiGiCo console platform. Harrison posts:
“Among the new updates in LiveTrax 3 is a new session creation feature - exclusive to DiGiGo, as well as the ability to seamlessly transfer console channel names to LiveTrax tracks. The new software also features capabilities including automated marker insertion when a snapshot is fired, macro control of LiveTrax Transport, intelligent recall of audio routing settings, automatic session creation based on the console configuration (digico exclusive), dynamic meter bar scaling based on audio interface configuration up to 512 inputs, provides a stereo mix while recording for streaming applications and much more.”
All of these are incredible features, and I am really looking forward to trying it out soon. However, there is one feature in Reaper that I have not talked much about, but has been an absolute game-changer for me. This feature is the render section.
The render section of Reaper is incredibly daunting when you first open it up. There are so many features, all presented at once. The scope of what the render menu can do is beyond this post, but I want to walk you through my specific workflow and how to set it up.
I use the render section to export regions that I've marked per song based on snapshots. Each band member’s mix gets exported per song, and I have those auto-upload to Dropbox at the end of rehearsal or show day. I also use this export to downsample everything into a 48k MP3 to minimize the amount of data when they stream the song to their phone. With a couple of clicks, I can set my Reaper session to export multiple band member’s mixes per song to a Dropbox folder while I am walking around collecting IEM packs. By the time they get to their car, they can start listening to what they just finished working on.
Let’s walk through how to set this up assuming you are already multitracking mixes into Reaper:
1) The first step is making sure that you have markers dropped at the start of each song. Additionally, if I am at a rehearsal, it is helpful to have an end marker at the tail of the song if the songs do not flow right into the next. This avoids dead air in the recording. My preferred way to drop markers is via snapshots from the console through something like Companion or MarkerMatic.
2) The next step is making sure you have downloaded and installed SWS Extensions, which is a free third-party bundle of actions that further expand the abilities of Reaper. Within this bundle, there is a command in particular that we need: Convert Markers to Regions. When you run this command (which you can also assign to a hotkey), it allows the markers you dropped to be selectable in the next section.
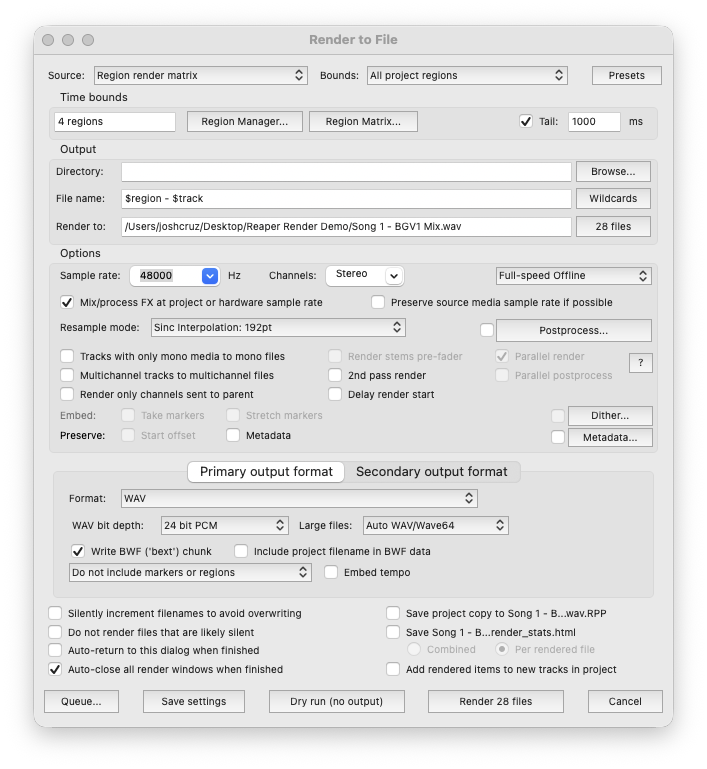
3) Third, open up the render window under File > Render. Here we need to set a few settings:
- Source - Set to “Region render matrix”
- Bounds - Set to “Selected regions”
- Output - Set your desired render directory. I usually pick a dropbox folder so it is uploading as soon as it is rendered.
- File Name - I like to utilize the wildcards which allow me to auto-name the files. For example, I use “$region - $track” or the inverse depending on file organization preference.
- Options - Here you can select things like sample rate and the output format. You can even export to two different formats simultaneously.
(It is worth noting that once you get all of this set, you can easily save these settings under the preset menu at the top right so you can easily recall them every time you need to do this.)
4) Next, at the top of the window, under source and bounds, you can select the “Region Matrix”. This is where you can select the exact region you need and only on the specific mixes you would like. Clicking and dragging is also supported, so selecting a whole row or column is simple.
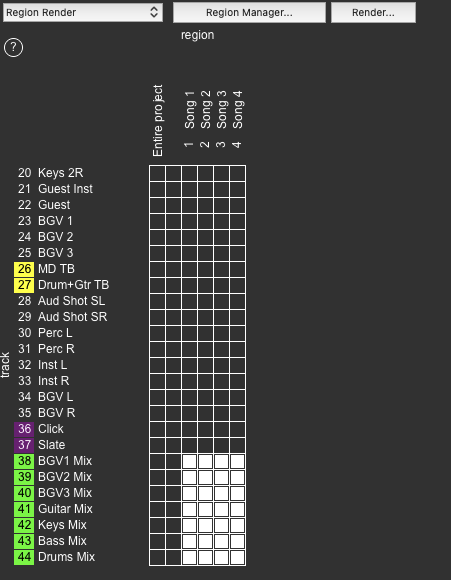
5) Once you have selected the regions you need, you should see at the bottom of the render window that the number of rendered files matches how many you have selected. At this point, you can test run the render with a dry output, or you can go ahead and click render.
Depending on the settings and conversion, the offline bounce should be incredibly quick. Be aware that downsampling takes more time.
One bonus feature I have also used is that there is a render queue. This allows for even more render automation. You can queue up multiple renders that it will automatically cycle through as it finishes. For example, if you need to bounce the mixes per song, but then also need to bounce a full pass with some different editing, you can queue both things up and only have to hit render once. Additionally, it also works between sessions. You can queue up renders within multiple projects, and it will automatically open and close the necessary projects.
The render section in reaper has changed how I view the tool of multitrack recording. Virtual soundcheck is incredibly valuable, but it is becoming more than that. It is a near instantaneous practice tool. It is a second playback machine so the band can reference a previous show in their ears. Furthermore, it gives me more flexibility as a monitor engineer. There is so much more that Reaper can do that I have probably not even discovered. If you have any other cools tricks that you use within Reaper, please let me know!